Our KineMaster review will help you decide whether the many features of this mobile editing app are worth the subscription fee.
The majority of the best video editing software (opens in new tab) is designed for desktop and laptop computers, but editing apps for cell phones and tablets are becoming increasingly popular.
While many mobile apps, such as Apple’s iMovie, are simple, KineMaster(opens in new tab) is a more sophisticated option. It has a multi-layer interface and a plethora of features, including blending modes, chroma keying, and audio mixing. It was first released for Android devices in 2013 and for iOS devices in 2017. It is now on version 4.15.
The standard edition of KineMaster is free, but it watermarks your finished videos. You must pay a premium subscription fee of $4.99 per month or $39.99 per year to remove the watermark and gain access to advanced features. In this review, we’ll look at some of KineMaster’s key features to see if they’re worth the money.
[irp]
KineMaster: Editing interface with multiple layers
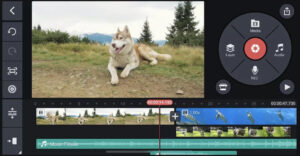
Some editing apps for mobile devices have incredibly simple user interfaces and offer a lot less functionality than desktop editing tools. More features are available on KineMaster’s interface.
The timeline is located in the bottom half of the screen, with the main video layer at the top, subsequent video layers below it, and audio layers beneath it. A preview monitor is located in the upper left of the screen. Additionally, there is a wheel with several possibilities to add media in the top right, including from your albums, the camera on your device, and the KineMaster stock library. This wheel is replaced by the many effects and tweaks you can make when you choose a clip in your timeline.
It doesn’t take long to figure out what everything does and where to discover the functions thanks to the user-friendly and appealing layout. Drag and dropping clips between layers and trimming them are simple operations.
There are several restrictions, mostly in relation to how crucial the primary video layer is. Unlike the other layers, this one cannot have any gaps, and its length defines how long the video will be.
KineMaster: Lighting adjustments and colour
There are sliders to change brightness, contrast, saturation, and other aspects of a clip’s appearance. You can also choose from a variety of Instagram-inspired filters. This makes it simple for less skilled editors to swiftly give their videos a pleasing appearance, but because there aren’t many fine-tuning options, it’s not the greatest solution if you’re seeking for expert colour grading.

KineMaster: Chroma key and blending
Blending modes can be used to alter how a clip on a second layer interacts with the layers beneath it. Anyone who has used Photoshop is familiar with the variety of modes available, including overlay, multiply, soft light, hard light, and others. All of these modes are useful, albeit there aren’t many options for fine-tuning.
Chroma key functionality is also included. There are other ways to fine-tune the effect, including removing greenscreens to place a presenter in front of a graphic background.

KineMaster: Title graphics
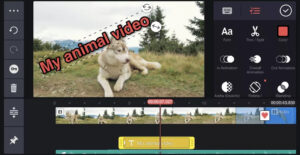
You have two alternatives for adding text graphics to your videos: either create a text layer or use “clip graphics,” which are more intricate pre-made effects.
[irp]
You can move the writing to any location on the timeline and change a variety of things by using the text layers. The clip visuals can be fairly gimmicky, like a headline inside a cartoon explosion, and are less versatile because they must link to a specific clip on the primary video layer.
KineMaster: Transitions
Finding and using transitions from one clip to the next is simple. You are, however, limited to the options available, and many of them, like the graphics in the title, appear gimmicky and kitsch, like a wipe in the shape of a heart.
Additionally, only clips on the main video layer are eligible for transitions. Clips on the additional levels can be animated in and out, but transitions between them and nearby clips are not permitted.

KineMaster: Audio effects
There are a wide variety of adjustments you can make to audio clips, just like you do with video. Each clip’s overall audio levels can be modified, and you can modify the volume while the clip is playing to combine it with other clips.
[irp]
Reverb effects and various EQ filters are used to give the clip different environmental sounds, such as boosting or lowering the bass. Additionally, you can use a variety of entertaining, albeit gimmicky, voice changer effects to give your voice the sound of a chipmunk, a robot, etc.

Should I purchase it?
KineMaster has an impressive feature set while remaining simple to use. It lacks the depth of fine-tuning options found in Premiere Pro or DaVinci Resolve, but it’s a step above most common mobile editing apps like iMovie.
We tested all of the aforementioned features on an iPhone 12 and found no lag, even when working with 4K clips, but some users have reported slower performance on older models.
KineMaster will not replace your primary desktop software, but it is a good option for quick editing away from the computer. It’s also a good option for less experienced editors looking for an easy-to-use app.
System requirements
iOS:
- iOS v11.4 or later
- Compatible with iPhone, iPad and iPod touch
Android:
- Android OS v6.0 or later